Saturday, September 23, 2017

Transform a Raspberry Pi 3b into an inexpensive 5250 terminal


The Raspberry Pi 3b kit, from various kit providers, costs around $50 including case, heat sinks and power supply. Add a 8GB microSDHC card for less than $10 and you've got the makings of an inexpensive (sub $60) 5250 terminal.

There are two basic methods we've used with good success to create a 5250 terminal from a Raspberry Pi. First, if you have an IBM-i with active SWMA and are running IBM-i 7.x, then the new IBM-i Access Client Solution is one option. Alternatively, if you're wanting a simple user interface with less user options (ie 5250-only) then the open source TN5250j project is your other option. Both of these programs are 100% java-based and thus can run on any OS or device that supports java without having to be recompiled.

The first basic assumption for our initial Raspberry Pi 5250 project is that we do not want a full GUI with all the bloat-ware that comes with Raspbian OS (as of the date of this post the current version is Raspbian Jessie). Thus, we're building this with Raspbian Jessie Lite and adding a basic GUI. The second assumption is that we only want 5250 functionality and none of the user data connectivity offered by the IBM Access Client Solutions application, thus we will use the TN5250J product for this post.

Here are the basic steps that I will outline in some detail in this article:


  1. Download software and prep the microSD card
  2. Install the Raspbian Jessie Lite OS
  3. Update and modify the Raspbian OS
  4. Copy 5250 program and modify files
  5. Modify the boot load sequence of OS to auto-launch 5250


Step1: Download the Raspbian Jessie Lite .img file zip archive and unzip. If you're a Windows user you'll need to install Win32DiskImager. Also, go ahead and download TN5250J from sourceforge. If you purchase a new microSCHC card it should already be formatted, if not format as FAT32.

Step 2: Use Win32DiskImager to burn the Raspian Jessie Lite .img file to the microSD card. My suggestion is that if you're going to use this microSD as a template for creating more microSD cards for more terminals, use a 4GB microSD card as your template. That way the image you'll create will be 4GB instead of 8, 16 or 32GB. Once Win32DiskImager finishes writing the .img to the microSD card, Windows will prompt you to Format the drive - CANCEL this prompt. Accept and Exit Win32DiskImager. Eject the microSD card.

Step 3: Time to hone your Linux chops or learn some new ones. Once you insert the microSD card into your pi and apply power, the OS should boot to a login prompt. UserID: pi and Password: raspberry.

sudo raspi-config ->(4)localization -> (I1)Locales->Change Locale; scroll down and un-select (using space bar) en_GB.UTF-8 (unless of course you live in Great Britain), scroll down further to en_US.UTF-8 (for those in the US), tab, OK, on the next screen arrow down to en_US.UTF-8 (or other selected locale), tab, OK (this will generate locale files); Next, set your timezone: (I2)timezone (in my case US->Central); localization -> (I3)keyboard (Generic US/104 or other depending on location), next; the system defaults to English(GB), so scroll down to Other, select appropriate option, in my case English (US), next, scroll to top of list, US (English) or other language as appropriate; OK. Next, you should change the default pi password for security; finish (should prompt to reboot); if not, type sudo reboot at the terminal prompt.

Now for installing a base GUI without all the stock bloat-ware:


To make the RaspPi automatically boot to the GUI, use sudo raspi-config to go to Boot Option menu ->(B1)Desktop/CLI -> (B4)Desktop Autologin; tab; OK; tab; Finish;

Step 4: Next, we'll download tn5250j-0.7.6-full-bin.zip (or latest version) from SourceForge and unzip. Rename the unzipped folder to tn5250j for simplicity. Copy the folder to a USB stick. Insert the USB stick into the booted RaspberryPi. The GUI should automatically prompt to "Open with File Manager". Use File Manager to drag the tn5250j folder to /home/pi/ folder.


To create shell script for running TN5250J program:


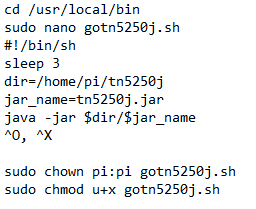
To enable TN5250J to auto-start when pi boots:


To add an icon to the Desktop for TN5250J, go to a terminal session:


At this point, if you reboot the RasPi the system should auto-login to the GUI and then launch the TN5250J program (if you elected for auto-launch option above). You can then set up a terminal session to your IBM-i system (yes, you can define multiple sessions), remap your keyboard (by default the enter key on the number pad isn't mapped as Enter). You're restricted to two key maps per function, so if you're used to the right control key also being an Enter key, you'll have to choose. If for some reason you should have an issue with the TN5250J application locking up on launch due to a possible error in session settings, just launch a terminal session, cd /home/pi/.tn5250j *important: put the period in front of tn5250j in this case, as it is a hidden directory that contains the configuration files*. Typing pwd will display your current directory. Use ls -l to display files in the directory. You can delete the sessions file using sudo rm sessions. TN5250J will recreate the sessions file when you launch TN5250J and re-add the sessions to the configuration screen.  Always remember to click APPLY.  Mark the first session you create as "default" and it will auto-launch that session every time the device boots.  Also, to modify session or add sessions, you must right-click the mouse inside the session window and the edit options panel will pop up.

If you want the Display Power Management System (DPMS) to NOT auto-sleep the display (ie the screen stay ON all the time), add the following line to the lightdm.conf file:

cd /etc/lightdm
ls -l
(should be a file called lightdm.conf in that directory)
sudo nano /etc/lightdm/lightdm.conf
arrow down to the [SeatDefaults] section of the file
add the following line underneath
[SeatDefaults]
xserver-command=X -s 0 -dpms

^O, enter to save, ^X to exit

Another "nice to have" feature would be to enable VNC via the raspi-config function so that you can provide remote support for the RasPi terminal. There is also a Citrix Receiver built for the Raspberry Pi as well as a Parallels 2X client, RDP client, and several browsers including Chrome and Firefox. Setup and installation of those are a subject for another post.  You can also set the top Panel bar to AutoHide so that if you're using the device without a mouse the panel bar doesn't show at the top of the screen.

In case you were interested, my typical hardware configuration as of this post consists of a RaspberryPi 3b board ($34.99), an Enokay case ($5.99) which screws together and comes with the two heat sinks needed for the pi board, a NorthPada power supply with on/off switch for $8.99 and an 8GB SANDisk microSD card which in bulk costs around $5.50.  Don't forget an HDMI to VGA or HDMI to DVI converter cable if your monitor(s) do not have HDMI input ports.

Wednesday, September 6, 2017

Brocade Fiber Channel Switch administration and Java support in new browsers


Older model Brocade Fiber Channel switches including IBM OEM Brocade switches use a Java webstart applet (Java Network Launching Protocol or JNLP file) for administration.  If you've tried to administer a Brocade Fiber Channel switch lately with a newer browser, it is likely you've been denied access.  Chrome, Firefox and IE have all discontinued support for NPAPI plugins, including Java webstart.

Pale Moon to the rescue!

The Pale Moon browser (from palemoon.org) is a fork of the Mozilla/Firefox code and has not (as of the date of this posting) removed the NPAPI Java plugin support.  While they do recommend that you DISABLE this feature for security purposes, the ability to associate a JNLP file with a java webstart executable and run java applications in the browser via the NPAPI plugin is still supported.

To resolve your problem with administering your Brocade Fiber Channel switch using the Java applet, do the following (note: this assumes you already have Java installed):

1. Download and install the Pale Moon browser
2. Reboot your machine
3. Launch the Pale Moon browser
4. Point the URL to the IP or DNS address of your Brocade switch
5. When prompted on how to launch the JNLP file, browse to your Program Files (or Program Files x86 if 32-bit) Java directory, select the java version you want to use (directory), go to the bin directory, and select the javaws.exe as the executable for the JNLP file.  For example: C:\>Program Files\Java\jre1.8.0_91\bin\
6. If you receive a java security error, go to the Java app properties, go to the Security tab, and add the DNS or IP entry to the Exception Site list.  Don't forget to put http:// or https:// in front of the entry.

I've had this solve my Brocade switch java access problem on IBM 2498 series switches including the 2498-B24 and 2498-24E (Brocade 300-series), as well as the Brocade 5470-based BNT Fiber Channel 10 and 20-port switches for the IBM Bladecenter Chassis.  This also works on the Cybernetics VTL administration control panel for Cybernetics Virtual Tape Library devices.  I have had the case on one laptop where I had to go into the file associations (I think it was a Windows 8.1 system) and associate the JNLP file type with the javaws.exe for execution. 


Thursday, February 9, 2017

Move Your File Server to the "Cloud"

Saturday, August 31, 2013


Every once in a while you rediscover an old DOS command that, once remembered, you wonder why you haven't been using it more often.  I ran into this situation recently with what I considered to be a "bug" in a software vendor's installer package.  The instructions from the vendor said that to upgrade from version 2.x.x of their software to version 3.x, you should install the new v3.x to a temporary directory and then copy selected files over to the 2.x production directory.  Yeah, so this was a Linux application that had been ported over to Windows and there was no "upgrade" installation option.  Unfortunately, as I clicked on the .exe, the installer had a forced option for the directory to which it would install the program, which had I taken the defaults would have overwrote my production copy of the software, along with my data and custom settings.  What is a tech to do?  The easy thing would have been to simply done a "net use" and mapped a drive letter to one of my network server share directories and proceeded with the installation.  Would I ever do ANYTHING the easy way?  Of course not - because then I questioned "well, what if I didn't have a network server I could map to, then what would I do?"  So, I went to Windows Explorer and attempted to map a drive letter to a local directory via the GUI.  No dice.  Not an option.  Thus began my journey back to my DR DOS days and the SUBST command.

SUBST is a useful command line tool that allows you to map a drive letter to a local directory.


By using the SUBST command I was able to map a drive letter to a local directory, execute the software vendor's flawed Windows installer, and successfully copy the necessary files to upgrade my software from v2.x to v3.x.  In my case: c:\> subst p: c:\tmpdir1 was able to do the trick.

Never underestimate the power of and old DOS command to save the day.

Sunday, November 4, 2012

Install Windows Server 2008 r2 from USB

===================================
*note: edited 08/19/2016.  See notes for UEFI errors on newer PCs/Laptops when attempting to use bootsect.exe command and receive failure.
===================================

After many attempts at finding the "best" solution to installing Windows Server 2008 R2 from a USB stick, here's what worked consistently for me.

First, and while obvious I'll still point it out, your USB stick needs to be at least 3GB.

Steps:

Insert the USB drive
Run CMD.exe as Administrator
C:\>diskpart

DISKPART>list disk


DISKPART> select disk 1
Disk 1 is now the selected disk

*note: in my case since I only have a single internal hard disk in my laptop, the USB drive shows as disk 1, an 8GB stick.  If you have more than one disk already installed/mounted on your PC, then modify the select statement accordingly to point to your target USB device.

DISKPART> clean
DiskPart succeeded in cleaning the disk.

DISKPART>create partition primary
DiskPart succeeded in creating the specified partition.

DISKPART>active
DiskPart marked the current partition active.

DISKPART>format fs=fat32 quick
   100 percent completed.
DiskPart successfully formatted the volume.

DISKPART>assign
DiskPart successfully assigned the drive letter or mount point.

DISKPART>exit

C:\>

Don't close your command window, but jump back into Windows Explorer to see what drive letter has now been assigned to your USB disk.  In my case it is G:  Now, if you haven't already, either mount the ISO using Daemon Tools or some similar utility to mount the ISO as readable by the OS, or insert the Windows Server 2008 R2 DVD.  My mounted ISO shows up as D: drive.  You can also type: list volume at the DISKPART prompt to get this information.

Go back to the command prompt window.  Change drive letters to the mounted ISO or physical DVD to proceed.

d:
D:\>
cd boot
bootsect.exe /NT60 g:
xcopy d:\*.* /e /s /f g:

The X17-22580.ISO release of Windows Server 2008 R2 shows 996 files copied for a total of 2.97GB.  Now, go to Windows Explorer and copy any drivers specific to the system you'll be installing Windows Server 2008 r2 onto the USB stick; in my case I just created a "Drivers" directory and placed each (Raid Controller, OnBoard Ethernet, SAS controller, Fibre Channel Controllers) into it's own subdirectory.  Exit the command prompt and eject your USB stick - you are now ready to install Windows Server 2008 R2 from USB.  Remember, of course, to change your boot order on your server to boot to the USB drive - on IBM System x servers that is easiest done by hitting the F12 key during the boot sequence.

I'll test this for a post in the very near future with Windows Server 2012.
**note: tested.  Same logic applies for Windows Server 2012r2 as for 2008/2008r2**

On a newer PC, laptop or tablet computer, you may receive the following error:

This tool can only be run on systems booted using a pc/at bios. This system was booted using EFI or some other firmware type

There are two ways of dealing with this.  1) If you're running Windows 8 or Windows 10, use the bootsect.exe command located on your local hard drive instead of the one on the Windows Server 2008 or 2012 DVD.  Alternatively, avoid ALL of this tediousness and download RUFUS. 

https://rufus.akeo.ie/

*latest update 08/19/16*

Friday, May 11, 2012

Windows XP Remote Desktop to Server 2008 R2


Enabling Network Level Authentication : Windows XP Remote Desktop

If you still have any Windows XP machines left out there, then you will encounter an error message when you try to use the XP RDC client to connect to a Windows 2008 Server: The remote computer requires Network Level Authentication, which your computer does not support.

Network Level Authentication is an authentication method that can be used to enhance RD Session Host server security by requiring that the user be authenticated to the RD Session Host server before a session is created.

Network Level Authentication completes user authentication before you establish a remote desktop connection and the logon screen appears. This is a more secure authentication method that can help protect the remote computer from malicious users and malicious software. The advantages of Network Level Authentication are:
  • It requires fewer remote computer resources initially. The remote computer uses a limited number of resources before authenticating the user, rather than starting a full remote desktop connection as in previous versions.
  • It can help provide better security by reducing the risk of denial-of-service attacks.
To use Network Level Authentication, you must meet the following requirements:
  • The client computer must be using at least Remote Desktop Connection 6.0.
  • The client computer must be using an operating system, such as Windows 7, Windows Vista, or Windows XP with Service Pack 3, that supports the Credential Security Support Provider (CredSSP) protocol.
  • The RD Session Host server must be running Windows Server 2008 R2 or Windows Server 2008.
The error requires a few steps to resolve, but once done then you will be able to easily connect.

First, the Windows XP machine has to be at Service Pack 3.

Secondly, update the Remote Desktop Connection client to version 7 using this link:
Remote Desktop Connection 7.0
http://support.microsoft.com/kb/969084/en-us

Now, the more complicated steps that require a registry edit:

1. Click Start, click Run and then type regedit. Press ENTER.

2. In the left hand navigation pane, locate and then click the following registry subkey: HKEY_LOCAL_MACHINE\SYSTEM\CurrentControlSet\Control\Lsa

3. In the right hand details pane, right-click Security Packages, and then click Modify.

4. In the Value data box there will probably be other entries in a list; arrow down to the bottom of the list and add a line that says: tspkg . Leave the other entries that are specific to other SSPs, and then click OK.

5. In the left hand navigation pane, locate and then click the following registry subkey: HKEY_LOCAL_MACHINE\SYSTEM\CurrentControlSet\Control\SecurityProviders

6. In the right hand details pane, right-click SecurityProviders, and then click Modify.

7. In the Value data box there will be a list of DLLs, each separated by a comma; arrow over to the end of the list, type a comma after the last entry, and then type credssp.dll.  Leave the existing entries intact that are specific to other SSPs, and then click OK.

8. Exit Registry Editor.

9. After you have edited the registry, you'll need to restart the computer.

Once these steps are complete and the computer has rebooted, you should now be able to successfully connect your Windows XP Pro system to a Windows 2008 Server via Remote Desktop Connection using Network Level Authentication.  Don't forget that if the XP Pro PC is not joined to the domain, you may need to type the domain name and then user name for server login, ie: \\ServerName\LoginUserName.


Thursday, October 27, 2011

Remote Server Monitoring with MobilePCMonitor


While I'm a big fan of systems like Solarwinds and other network/server/device monitoring solutions for larger corporate environments, there are many cases where one simply wants to monitor a few critical servers.  As if anyone needed another reason to buy a smartphone, take a look at MobilePCMonitor.  The beauty of this solution is it's hybrid approach, with an agent residing on the server or PC you wish to monitor, reporting to a hosted service at MPcM's datacenter.  So, while you have an agent to install on your machine(s), there's no server setup in your environment to make this work.  And, it gets better.  MPcM isn't just redlight/greenlight monitoring, you can tag services to monitor, disk space thresholds, cpu utilization, and more.  Should you get an alert on your smartphone (there are iOS, Android and WinPhone7 apps), you can log into your PC from the mobile app and perform a myriad of tasks instead of breaking out the laptop and hoping to get a reliable VPN connection via your cellular modem.  Still not convinced?  It's free to try for up to 3 monitored devices, and for up to 25 devices it's only $181 per year (total, not per device), making it a real bargain.

Key Features:

Monitor:
    * View the status and uptime of all computers
    * View the current CPU usage and usage history chart
    * View the current available memory and usage history chart
    * View the external IP address and the location on the map using GeoIP
    * View ping round trip response time and response time chart
    * View the status and browse the local hard disks
    * View the services status
    * View the network interfaces status and traffic chart
    * View running processes
    * View event logs
    * View the scheduled tasks status
    * View monitored ports status
    * View all logged in users (local and remote)
    * View hardware details like temperatures (system, CPU and HDD) and fan speeds (system and CPU)
    * View the status of web sites and application pools in Internet Information Server
    * Search and view user accounts status in Active Directory
    * View the list of locked user accounts in Active Directory
    * View the list of user groups in Active Directory
    * View performance counters

Send Commands:
    * Start, pause, continue and stop a service
    * Kill a process
    * Start and stop a scheduled task
    * Log off any logged in user (local or remote)
    * Send a message to the logged in users (local or remote)
    * Command prompt support
    * Restart, wake up (Wake on WAN over Internet is supported), shutdown, power off, suspend or send the computer into hibernation
    * Send commands to multiple computers in the same group
    * Start/stop/restart Internet Information Server web sites
    * Start/stop/recycle Internet Information Server application pools
    * Enable, disable, unlock and reset password for user accounts in Active Directory
    * Add and remove groups for a user account in Active Directory
    * Check and install Windows updates
    * Monitor and manage Exchange 2007 and 2010
    * Hyper-V support
    * Printers management
    * Mobile device authorization for system commands - only selected authorized devices on your account can be allowed to send system commands

Get Notified:
    * When a computer goes offline
    * When a computer starts up, shuts down, suspends or resumes
    * When a computer battery level is low
    * When a monitored service stopped unexpectedly
    * When the free memory is below a specified percentage
    * When the processor usage is above a specified percentage for a specified period of time
    * When the free space of a hard disk drive is below a specified percentage
    * When a user logs in or logs out
    * When ping round trip time is above a specified value for a specified period of time
    * When a monitored port is closed
    * When an event log entry is generated and it matches a specified filter
    * When the CPU, system or HDD temperature exceeds a specified threshold
    * When the CPU or system fan speed is below a specified threshold
    * When a web site has stopped on Internet Information Server
    * When an application pool has stopped on Internet Information Server

This is a great solution for smaller environments where you simply need notification in case of a problem, and the ability to quickly resolve the problem remotely via your smartphone.  They also have a dashboard application you can run on your PC to constantly show monitored device status.  For larger environments they offer an Enterprise version that you can run on an internal server instead of relying on their hosted service.
...