Saturday, September 23, 2017

Transform a Raspberry Pi 3b into an inexpensive 5250 terminal


The Raspberry Pi 3b kit, from various kit providers, costs around $50 including case, heat sinks and power supply. Add a 8GB microSDHC card for less than $10 and you've got the makings of an inexpensive (sub $60) 5250 terminal.

There are two basic methods we've used with good success to create a 5250 terminal from a Raspberry Pi. First, if you have an IBM-i with active SWMA and are running IBM-i 7.x, then the new IBM-i Access Client Solution is one option. Alternatively, if you're wanting a simple user interface with less user options (ie 5250-only) then the open source TN5250j project is your other option. Both of these programs are 100% java-based and thus can run on any OS or device that supports java without having to be recompiled.

The first basic assumption for our initial Raspberry Pi 5250 project is that we do not want a full GUI with all the bloat-ware that comes with Raspbian OS (as of the date of this post the current version is Raspbian Jessie). Thus, we're building this with Raspbian Jessie Lite and adding a basic GUI. The second assumption is that we only want 5250 functionality and none of the user data connectivity offered by the IBM Access Client Solutions application, thus we will use the TN5250J product for this post.

Here are the basic steps that I will outline in some detail in this article:


  1. Download software and prep the microSD card
  2. Install the Raspbian Jessie Lite OS
  3. Update and modify the Raspbian OS
  4. Copy 5250 program and modify files
  5. Modify the boot load sequence of OS to auto-launch 5250


Step1: Download the Raspbian Jessie Lite .img file zip archive and unzip. If you're a Windows user you'll need to install Win32DiskImager. Also, go ahead and download TN5250J from sourceforge. If you purchase a new microSCHC card it should already be formatted, if not format as FAT32.

Step 2: Use Win32DiskImager to burn the Raspian Jessie Lite .img file to the microSD card. My suggestion is that if you're going to use this microSD as a template for creating more microSD cards for more terminals, use a 4GB microSD card as your template. That way the image you'll create will be 4GB instead of 8, 16 or 32GB. Once Win32DiskImager finishes writing the .img to the microSD card, Windows will prompt you to Format the drive - CANCEL this prompt. Accept and Exit Win32DiskImager. Eject the microSD card.

Step 3: Time to hone your Linux chops or learn some new ones. Once you insert the microSD card into your pi and apply power, the OS should boot to a login prompt. UserID: pi and Password: raspberry.

sudo raspi-config ->(4)localization -> (I1)Locales->Change Locale; scroll down and un-select (using space bar) en_GB.UTF-8 (unless of course you live in Great Britain), scroll down further to en_US.UTF-8 (for those in the US), tab, OK, on the next screen arrow down to en_US.UTF-8 (or other selected locale), tab, OK (this will generate locale files); Next, set your timezone: (I2)timezone (in my case US->Central); localization -> (I3)keyboard (Generic US/104 or other depending on location), next; the system defaults to English(GB), so scroll down to Other, select appropriate option, in my case English (US), next, scroll to top of list, US (English) or other language as appropriate; OK. Next, you should change the default pi password for security; finish (should prompt to reboot); if not, type sudo reboot at the terminal prompt.

Now for installing a base GUI without all the stock bloat-ware:


To make the RaspPi automatically boot to the GUI, use sudo raspi-config to go to Boot Option menu ->(B1)Desktop/CLI -> (B4)Desktop Autologin; tab; OK; tab; Finish;

Step 4: Next, we'll download tn5250j-0.7.6-full-bin.zip (or latest version) from SourceForge and unzip. Rename the unzipped folder to tn5250j for simplicity. Copy the folder to a USB stick. Insert the USB stick into the booted RaspberryPi. The GUI should automatically prompt to "Open with File Manager". Use File Manager to drag the tn5250j folder to /home/pi/ folder.


To create shell script for running TN5250J program:
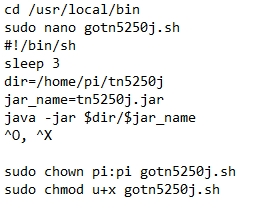


To enable TN5250J to auto-start when pi boots:


To add an icon to the Desktop for TN5250J, go to a terminal session:


At this point, if you reboot the RasPi the system should auto-login to the GUI and then launch the TN5250J program (if you elected for auto-launch option above). You can then set up a terminal session to your IBM-i system (yes, you can define multiple sessions), remap your keyboard (by default the enter key on the number pad isn't mapped as Enter). You're restricted to two key maps per function, so if you're used to the right control key also being an Enter key, you'll have to choose. If for some reason you should have an issue with the TN5250J application locking up on launch due to a possible error in session settings, just launch a terminal session, cd /home/pi/.tn5250j *important: put the period in front of tn5250j in this case, as it is a hidden directory that contains the configuration files*. Typing pwd will display your current directory. Use ls -l to display files in the directory. You can delete the sessions file using sudo rm sessions. TN5250J will recreate the sessions file when you launch TN5250J and re-add the sessions to the configuration screen.  Always remember to click APPLY.  Mark the first session you create as "default" and it will auto-launch that session every time the device boots.  Also, to modify session or add sessions, you must right-click the mouse inside the session window and the edit options panel will pop up.

If you want the Display Power Management System (DPMS) to NOT auto-sleep the display (ie the screen stay ON all the time), add the following line to the lightdm.conf file:

cd /etc/lightdm
ls -l
(should be a file called lightdm.conf in that directory)
sudo nano /etc/lightdm/lightdm.conf
arrow down to the [SeatDefaults] section of the file
add the following line underneath
[SeatDefaults]
xserver-command=X -s 0 -dpms

^O, enter to save, ^X to exit

Another "nice to have" feature would be to enable VNC via the raspi-config function so that you can provide remote support for the RasPi terminal. There is also a Citrix Receiver built for the Raspberry Pi as well as a Parallels 2X client, RDP client, and several browsers including Chrome and Firefox. Setup and installation of those are a subject for another post.  You can also set the top Panel bar to AutoHide so that if you're using the device without a mouse the panel bar doesn't show at the top of the screen.

In case you were interested, my typical hardware configuration as of this post consists of a RaspberryPi 3b board ($34.99), an Enokay case ($5.99) which screws together and comes with the two heat sinks needed for the pi board, a NorthPada power supply with on/off switch for $8.99 and an 8GB SANDisk microSD card which in bulk costs around $5.50.  Don't forget an HDMI to VGA or HDMI to DVI converter cable if your monitor(s) do not have HDMI input ports.

Wednesday, September 6, 2017

Brocade Fiber Channel Switch administration and Java support in new browsers


Older model Brocade Fiber Channel switches including IBM OEM Brocade switches use a Java webstart applet (Java Network Launching Protocol or JNLP file) for administration.  If you've tried to administer a Brocade Fiber Channel switch lately with a newer browser, it is likely you've been denied access.  Chrome, Firefox and IE have all discontinued support for NPAPI plugins, including Java webstart.

Pale Moon to the rescue!

The Pale Moon browser (from palemoon.org) is a fork of the Mozilla/Firefox code and has not (as of the date of this posting) removed the NPAPI Java plugin support.  While they do recommend that you DISABLE this feature for security purposes, the ability to associate a JNLP file with a java webstart executable and run java applications in the browser via the NPAPI plugin is still supported.

To resolve your problem with administering your Brocade Fiber Channel switch using the Java applet, do the following (note: this assumes you already have Java installed):

1. Download and install the Pale Moon browser
2. Reboot your machine
3. Launch the Pale Moon browser
4. Point the URL to the IP or DNS address of your Brocade switch
5. When prompted on how to launch the JNLP file, browse to your Program Files (or Program Files x86 if 32-bit) Java directory, select the java version you want to use (directory), go to the bin directory, and select the javaws.exe as the executable for the JNLP file.  For example: C:\>Program Files\Java\jre1.8.0_91\bin\
6. If you receive a java security error, go to the Java app properties, go to the Security tab, and add the DNS or IP entry to the Exception Site list.  Don't forget to put http:// or https:// in front of the entry.

I've had this solve my Brocade switch java access problem on IBM 2498 series switches including the 2498-B24 and 2498-24E (Brocade 300-series), as well as the Brocade 5470-based BNT Fiber Channel 10 and 20-port switches for the IBM Bladecenter Chassis.  This also works on the Cybernetics VTL administration control panel for Cybernetics Virtual Tape Library devices.  I have had the case on one laptop where I had to go into the file associations (I think it was a Windows 8.1 system) and associate the JNLP file type with the javaws.exe for execution. 


Thursday, February 9, 2017

Move Your File Server to the "Cloud"

Saturday, August 31, 2013


Every once in a while you rediscover an old DOS command that, once remembered, you wonder why you haven't been using it more often.  I ran into this situation recently with what I considered to be a "bug" in a software vendor's installer package.  The instructions from the vendor said that to upgrade from version 2.x.x of their software to version 3.x, you should install the new v3.x to a temporary directory and then copy selected files over to the 2.x production directory.  Yeah, so this was a Linux application that had been ported over to Windows and there was no "upgrade" installation option.  Unfortunately, as I clicked on the .exe, the installer had a forced option for the directory to which it would install the program, which had I taken the defaults would have overwrote my production copy of the software, along with my data and custom settings.  What is a tech to do?  The easy thing would have been to simply done a "net use" and mapped a drive letter to one of my network server share directories and proceeded with the installation.  Would I ever do ANYTHING the easy way?  Of course not - because then I questioned "well, what if I didn't have a network server I could map to, then what would I do?"  So, I went to Windows Explorer and attempted to map a drive letter to a local directory via the GUI.  No dice.  Not an option.  Thus began my journey back to my DR DOS days and the SUBST command.

SUBST is a useful command line tool that allows you to map a drive letter to a local directory.


By using the SUBST command I was able to map a drive letter to a local directory, execute the software vendor's flawed Windows installer, and successfully copy the necessary files to upgrade my software from v2.x to v3.x.  In my case: c:\> subst p: c:\tmpdir1 was able to do the trick.

Never underestimate the power of and old DOS command to save the day.

Sunday, November 4, 2012

Install Windows Server 2008 r2 from USB

===================================
*note: edited 08/19/2016.  See notes for UEFI errors on newer PCs/Laptops when attempting to use bootsect.exe command and receive failure.
===================================

After many attempts at finding the "best" solution to installing Windows Server 2008 R2 from a USB stick, here's what worked consistently for me.

First, and while obvious I'll still point it out, your USB stick needs to be at least 3GB.

Steps:

Insert the USB drive
Run CMD.exe as Administrator
C:\>diskpart

DISKPART>list disk


DISKPART> select disk 1
Disk 1 is now the selected disk

*note: in my case since I only have a single internal hard disk in my laptop, the USB drive shows as disk 1, an 8GB stick.  If you have more than one disk already installed/mounted on your PC, then modify the select statement accordingly to point to your target USB device.

DISKPART> clean
DiskPart succeeded in cleaning the disk.

DISKPART>create partition primary
DiskPart succeeded in creating the specified partition.

DISKPART>active
DiskPart marked the current partition active.

DISKPART>format fs=fat32 quick
   100 percent completed.
DiskPart successfully formatted the volume.

DISKPART>assign
DiskPart successfully assigned the drive letter or mount point.

DISKPART>exit

C:\>

Don't close your command window, but jump back into Windows Explorer to see what drive letter has now been assigned to your USB disk.  In my case it is G:  Now, if you haven't already, either mount the ISO using Daemon Tools or some similar utility to mount the ISO as readable by the OS, or insert the Windows Server 2008 R2 DVD.  My mounted ISO shows up as D: drive.  You can also type: list volume at the DISKPART prompt to get this information.

Go back to the command prompt window.  Change drive letters to the mounted ISO or physical DVD to proceed.

d:
D:\>
cd boot
bootsect.exe /NT60 g:
xcopy d:\*.* /e /s /f g:

The X17-22580.ISO release of Windows Server 2008 R2 shows 996 files copied for a total of 2.97GB.  Now, go to Windows Explorer and copy any drivers specific to the system you'll be installing Windows Server 2008 r2 onto the USB stick; in my case I just created a "Drivers" directory and placed each (Raid Controller, OnBoard Ethernet, SAS controller, Fibre Channel Controllers) into it's own subdirectory.  Exit the command prompt and eject your USB stick - you are now ready to install Windows Server 2008 R2 from USB.  Remember, of course, to change your boot order on your server to boot to the USB drive - on IBM System x servers that is easiest done by hitting the F12 key during the boot sequence.

I'll test this for a post in the very near future with Windows Server 2012.
**note: tested.  Same logic applies for Windows Server 2012r2 as for 2008/2008r2**

On a newer PC, laptop or tablet computer, you may receive the following error:

This tool can only be run on systems booted using a pc/at bios. This system was booted using EFI or some other firmware type

There are two ways of dealing with this.  1) If you're running Windows 8 or Windows 10, use the bootsect.exe command located on your local hard drive instead of the one on the Windows Server 2008 or 2012 DVD.  Alternatively, avoid ALL of this tediousness and download RUFUS. 

https://rufus.akeo.ie/

*latest update 08/19/16*

Friday, May 11, 2012

Windows XP Remote Desktop to Server 2008 R2


Enabling Network Level Authentication : Windows XP Remote Desktop

If you still have any Windows XP machines left out there, then you will encounter an error message when you try to use the XP RDC client to connect to a Windows 2008 Server: The remote computer requires Network Level Authentication, which your computer does not support.

Network Level Authentication is an authentication method that can be used to enhance RD Session Host server security by requiring that the user be authenticated to the RD Session Host server before a session is created.

Network Level Authentication completes user authentication before you establish a remote desktop connection and the logon screen appears. This is a more secure authentication method that can help protect the remote computer from malicious users and malicious software. The advantages of Network Level Authentication are:
  • It requires fewer remote computer resources initially. The remote computer uses a limited number of resources before authenticating the user, rather than starting a full remote desktop connection as in previous versions.
  • It can help provide better security by reducing the risk of denial-of-service attacks.
To use Network Level Authentication, you must meet the following requirements:
  • The client computer must be using at least Remote Desktop Connection 6.0.
  • The client computer must be using an operating system, such as Windows 7, Windows Vista, or Windows XP with Service Pack 3, that supports the Credential Security Support Provider (CredSSP) protocol.
  • The RD Session Host server must be running Windows Server 2008 R2 or Windows Server 2008.
The error requires a few steps to resolve, but once done then you will be able to easily connect.

First, the Windows XP machine has to be at Service Pack 3.

Secondly, update the Remote Desktop Connection client to version 7 using this link:
Remote Desktop Connection 7.0
http://support.microsoft.com/kb/969084/en-us

Now, the more complicated steps that require a registry edit:

1. Click Start, click Run and then type regedit. Press ENTER.

2. In the left hand navigation pane, locate and then click the following registry subkey: HKEY_LOCAL_MACHINE\SYSTEM\CurrentControlSet\Control\Lsa

3. In the right hand details pane, right-click Security Packages, and then click Modify.

4. In the Value data box there will probably be other entries in a list; arrow down to the bottom of the list and add a line that says: tspkg . Leave the other entries that are specific to other SSPs, and then click OK.

5. In the left hand navigation pane, locate and then click the following registry subkey: HKEY_LOCAL_MACHINE\SYSTEM\CurrentControlSet\Control\SecurityProviders

6. In the right hand details pane, right-click SecurityProviders, and then click Modify.

7. In the Value data box there will be a list of DLLs, each separated by a comma; arrow over to the end of the list, type a comma after the last entry, and then type credssp.dll.  Leave the existing entries intact that are specific to other SSPs, and then click OK.

8. Exit Registry Editor.

9. After you have edited the registry, you'll need to restart the computer.

Once these steps are complete and the computer has rebooted, you should now be able to successfully connect your Windows XP Pro system to a Windows 2008 Server via Remote Desktop Connection using Network Level Authentication.  Don't forget that if the XP Pro PC is not joined to the domain, you may need to type the domain name and then user name for server login, ie: \\ServerName\LoginUserName.


Thursday, October 27, 2011

Remote Server Monitoring with MobilePCMonitor


While I'm a big fan of systems like Solarwinds and other network/server/device monitoring solutions for larger corporate environments, there are many cases where one simply wants to monitor a few critical servers.  As if anyone needed another reason to buy a smartphone, take a look at MobilePCMonitor.  The beauty of this solution is it's hybrid approach, with an agent residing on the server or PC you wish to monitor, reporting to a hosted service at MPcM's datacenter.  So, while you have an agent to install on your machine(s), there's no server setup in your environment to make this work.  And, it gets better.  MPcM isn't just redlight/greenlight monitoring, you can tag services to monitor, disk space thresholds, cpu utilization, and more.  Should you get an alert on your smartphone (there are iOS, Android and WinPhone7 apps), you can log into your PC from the mobile app and perform a myriad of tasks instead of breaking out the laptop and hoping to get a reliable VPN connection via your cellular modem.  Still not convinced?  It's free to try for up to 3 monitored devices, and for up to 25 devices it's only $181 per year (total, not per device), making it a real bargain.

Key Features:

Monitor:
    * View the status and uptime of all computers
    * View the current CPU usage and usage history chart
    * View the current available memory and usage history chart
    * View the external IP address and the location on the map using GeoIP
    * View ping round trip response time and response time chart
    * View the status and browse the local hard disks
    * View the services status
    * View the network interfaces status and traffic chart
    * View running processes
    * View event logs
    * View the scheduled tasks status
    * View monitored ports status
    * View all logged in users (local and remote)
    * View hardware details like temperatures (system, CPU and HDD) and fan speeds (system and CPU)
    * View the status of web sites and application pools in Internet Information Server
    * Search and view user accounts status in Active Directory
    * View the list of locked user accounts in Active Directory
    * View the list of user groups in Active Directory
    * View performance counters

Send Commands:
    * Start, pause, continue and stop a service
    * Kill a process
    * Start and stop a scheduled task
    * Log off any logged in user (local or remote)
    * Send a message to the logged in users (local or remote)
    * Command prompt support
    * Restart, wake up (Wake on WAN over Internet is supported), shutdown, power off, suspend or send the computer into hibernation
    * Send commands to multiple computers in the same group
    * Start/stop/restart Internet Information Server web sites
    * Start/stop/recycle Internet Information Server application pools
    * Enable, disable, unlock and reset password for user accounts in Active Directory
    * Add and remove groups for a user account in Active Directory
    * Check and install Windows updates
    * Monitor and manage Exchange 2007 and 2010
    * Hyper-V support
    * Printers management
    * Mobile device authorization for system commands - only selected authorized devices on your account can be allowed to send system commands

Get Notified:
    * When a computer goes offline
    * When a computer starts up, shuts down, suspends or resumes
    * When a computer battery level is low
    * When a monitored service stopped unexpectedly
    * When the free memory is below a specified percentage
    * When the processor usage is above a specified percentage for a specified period of time
    * When the free space of a hard disk drive is below a specified percentage
    * When a user logs in or logs out
    * When ping round trip time is above a specified value for a specified period of time
    * When a monitored port is closed
    * When an event log entry is generated and it matches a specified filter
    * When the CPU, system or HDD temperature exceeds a specified threshold
    * When the CPU or system fan speed is below a specified threshold
    * When a web site has stopped on Internet Information Server
    * When an application pool has stopped on Internet Information Server

This is a great solution for smaller environments where you simply need notification in case of a problem, and the ability to quickly resolve the problem remotely via your smartphone.  They also have a dashboard application you can run on your PC to constantly show monitored device status.  For larger environments they offer an Enterprise version that you can run on an internal server instead of relying on their hosted service.
...

Wednesday, October 19, 2011

Clonezilla disk imaging


If you haven't tried it yet, let me highly recommend Clonezilla for simple disk imaging. An indispensable tool for us techies who want to save an existing disk state before effing up someone's server or PC, the fact that you can create a usb bootable version and carry it around with you is priceless.  I can't tell you how many times I've used this utility and the countless number of times it has saved my arse by being able to restore a disk (or just a single partition) to it's previous state.

You can visit the Clonezilla.org website to get the details and I'll outline here the step necessary for creating a bootable USB stick.  You can go here to download the ZIP file you'll need to create the USB bootable install or just let Tuxboot do all the work for you (my preference).  You'll need Tuxboot which you can get here and a USB stick which you'll need to insert and determine the drive letter assigned before we get started.  If not already formatted as FAT32, you can do so in Windows Explorer.  That said, the install is very small (less than 200MB) so an small USB stick will be perfect for this use - surely you have some 256MB or 512MB drive laying around that you thought you had no use for anymore.

Ok, the next steps are pretty easy once you have the Tuxboot file downloaded and USB stick inserted.

1) Run the Tuxboot executable (no install necessary)
2) By default the Clonezilla Live option button is selected at the top left.
3) click the button to the right to get the latest version
4) go to the bottom of the installer screen and select USB Drive (the default)
5) select the USB to install to and click on OK
6) let Tuxboot do it's magic and once done - you have a bootable USB drive with Clonezilla installed

I won't go into the details of using CloneZilla since you can get all the detailed use instructions here directly from the CloneZilla site. For you Windows 7 users, when you exit Clonezilla it will give the an error message, just click on "this program installed correctly" and all will be fine.

I recently used this on a brand new HP Slimline PC I had bought for testing some VMware ESXi v5.0.  I imaged the disk on the PC (first ever boot was to the USB via HP's F11 select boot option) to an external 1TB USB disk drive (whole disk image).  I installed my VMware ESXi 5.0 which proceeded to wipe the internal disk clean and install a multiple partitions and VMFS on the drive and was able to complete my testing.  Once done, I simply rebooted to the Clonezilla USB stick, restored the drive to it's original state and all was well.  Actually, I tested to make sure it worked by booting and making sure the disk came up to the "first boot" screens for HP setup and then shut down and re-imaged.  Not a lack of confidence in the Clonezille restore, just my good ole' "measure twice, cut once" approach.  Oh, and for those older PCs or servers that won't boot from USB, just download the Clonezilla ISO and burn a CD - some greatness available there albeit a little slower.

Thursday, October 13, 2011

Mounting VHD in Win7


Ok, this will be a very short post.  VHD virtual disk files can be mounted from within Windows 7 and used as a disk drive.  While I won't dwell on the many potential uses of this, here's a short overview of a recent desktop PC conversion experience.  Setting: old pentium PC with 40GB internal disk drive, and an external 40Gb USB drive that is slam full of pics and videos, with only a few hundred megabytes free.

First, you can get Disk2VHD from the Microsoft SysInternals website.  Instructions for use are on the download page as well. 

There's a simple GUI interface you can use or there's the command line option
example: disk2vhd * g:\vhd\myoldpc.vhd  - this will copy all volumes (*) to the path on g:, in my case an external USB disk.

Once I converted the internal disk to a VHD file on an external USB drive, I then moved the USB drive to the new PC and copied the VHD file over.  Then, thru the magic of disk manager (Start > right click on Computer >Manage>Storage>Disk Management) there appears on the right hand side of the screen - Disk Management>More Actions - the next menu shows an option to Attach VHD and then the following screen appears:


From there, you can then browse to the VHD file, select, mount and assign a drive letter.  Voila', you can now use the VHD as a native disk (or read only copy should you check the Read-Only box) in Windows 7.


Wednesday, October 5, 2011

TCP Keep Alive in Windows Vista and Server 2008

Most if not all of my posts are borne from the technology equivalent of a bare knuckles cage match in which I am paired with a technology foe heavier, taller and with longer arms... but luckily over the course of my years I've come out bruised and battered but triumphant a greater percentage of the time.  A recent challenge involved telnet sessions from a PC running Vista Business (don't laugh, there are some out there) continuously dropping their connections to a remote AIX host.  So, that's the intro, and in the details to follow you'll see how bruised I became but still ended up with a small victory.

To further set this up, understand that the remote site was previously connected to the home office site via an ATT MPLS circuit (T1), same PCs, and were having no connectivity issues.  A location change brought the opportunity to use a cable modem (16Mbs down/4Mbs up) and a Cisco ASA5505 to create a VPN connection back to corporate - much less expensive than a 3Mbs MPLS circuit and faster install at the new location.  And that's when the trouble started.  The PCs from the old location were moved and the VPN set up (host firewall is an ASA5510 on a remote cable internet circuit).  The reports were that if you left the PC running eTerm32 telnet to the AIX host for over 30 minutes without touching the keyboard, the session would drop.  Very frustrating because if you were in the middle of entering a long order you had to start over.  So, the assumption was it was a cable problem - so we spent days working with the cable company - all clear (yeah, I've heard that story before too).  So, we then moved to thinking maybe it was the 5505/5510 VPN tunnel - after a few calls with Cisco TAC and some minor adustments - still no resolution.

Now it's said that even a blind squirrel can sometimes find an acorn and what happens next may be just that, but here are the next set of tests.  I took an Ubuntu Linux server to the host site, set up with open SSH (yeah, tried SSH on the AIX box and sessions still dropped).  Using Putty on one of the Vista PCs I set up an ssh session to the Linux server and left it running overnight - to my surprise it was still working fine the next day.  Tried it again with eTerm32 to Linux and still, no dropped connections.  At this point we dove into AIX settings with IBM, all systems go, no detectable problems there.  Then, I put a Windows Server 2003 server at the host site running Terminal Services and then ran RDP sessions on the Vista PCs with eTerm32 running in the RDP on the terminal server - while we didn't have any dropped sessions, we did notice some times when you walked away and came back it would take a few mouse clicks or keystrokes, for it to respond.  Now here's where the blind squirrel comes in - the next step was to assume that maybe there was a problem with Vista and that's what led me to the following Microsoft Technet Article about optional TCP parameters in Windows Vista and Server 2008.  After adding these registry entries and rebooting the PCs at the remote site, we were no longer experiencing dropped telnet sessions. 

As you can see in the link, these are Optional registry entries for TCP keep alive - meaning by default they are not there.  There are two primary entries, KeepAliveTime and KeepAliveInterval that will then enable OS-level keep alive packets to a remote system.

So, here's a short set of instructions on adding these keys to the Vista registry.  It seems that Server 2008 and Windows 7 are also devoid of these settings, but I have not had time to test on these yet for the same problem of dropped sessions.

logged in with user having admin privileges
run REGEDIT
navigate to HKEY_LOCAL_MACHINE\System\CurrentControlSet\Services\Tcpip\Parameters
right click in right panel - select NEW - DWORD
type: KeepAliveTime  for the description and hit enter (no spaces and observe caps for K, A and T)
right click on KeepAliveTime and select MODIFY
click on the button beside decimal
type: 300000   in the box for value
click OK to save (should show 493e0 for hex after save)
**this sets the value to 5 minutes (300,000 milliseconds); default value per Microsoft technet
right click in right panel - select NEW - DWORD
type: KeepAliveInterval  for the description and hit enter (no spaces and observe caps for K, A and I)
right click on KeepAliveInterval and select MODIFY
click on the button beside decimal
type: 1000   in the box for value 
click OK to save (should show 3e8 for hex after save)
**this sets value to 1 second = 1000 milliseconds; default value per Microsoft technet
file - exit
reboot machine


........


Wednesday, April 20, 2011

Microsoft SyncToy


Microsoft's SyncToy tool is great, but often overlooked or unheard-of little piece of software. Intended to be used for synchronizing directories, this utility can be a great way to initiate backups of laptops, move and sync data to cloud storage, or simply keeping your files sync'd to a USB key for mobility.

You can download the SyncToy tool from the Microsoft webiste here. This link also contains a detailed description of the SyncToy tool and features. SyncToy requires the .NET Framework 2.0 or newer to be installed and now has a 64-bit version.

The major new features and improvements included in previous SyncToy 2.0 release are:


* Dynamic Drive Letter Assignment: Drive letter reassignment will now be detected and updated in the folder pair definition.

* True Folder Sync: Folder creates, renames and deletes are now synchronized for all SyncToy actions.

* Exclusion Filtering Based on Name: File exclusion based on name with exact or fuzzy matching.

* Filtering Based on File Attributes: The ability to exclude files based on one or more file attributes (Read-Only, System, Hidden).

* Unattended Folder Pair Execution: Addressed issues related to running scheduled folder pairs while logged off.

* Folder Pairs With Shared Endpoints: Ability for folder pairs associated with the same or different instances of SyncToy to share end-points.

* Command line enhancements: Added the ability to manage folder pairs via the command line interface.

* Re-Architect Sync Engine: The SyncToy engine has been rearchitected to provide scalability and the ability to add significant enhancements in future releases.

* Sync engine is also more robust insomuch that many single, file level errors are skipped without affecting the entire sync operation.

* Sync Encrypted Files: Sync of Encrypted files works when local folder and files are encrypted, which addresses the common scenario involving sync between local, encrypted laptop PC folder and remote, unencrypted desktop PC folder.

* 64-Bit Support: SyncToy now has a native 64-bit build (x64 only) for 64-bit versions of Windows.

* Folder pair rename

* Sub-folder Exclusion Enhancements: Descendents created under excluded sub-folders are automatically excluded. Usability improvements for the sub-folder exclusion dialog.

* Folder Pair Metadata Moved: Folder pair metadata removed from MyDocuments to resolve any issues with server-based folder pair re-direction setup.

Thursday, February 3, 2011

Compacting Virtualbox VDI files

How to compact an Oracle Virtualbox VDI file

As most of these posts do, this one originated in a problem that required me to stop everything and find a solution. I've been a long time Virtualbox user for running virtual machines on my laptop system for testing and demonstrations as well as application isolation. Well, a few days ago one of my Windows XP virtual machines was refusing to update an installed application; it would just fail. I checked the disk space inside the VM and it showed 12GB total space on C with 4GB free. Then, I dropped back to the host OS (Windows 7 Pro if you must know) and checked the size of the VDI file - it was 11.86GB. So, the solution search began. Here's what I was able to come up with to correct the problem. The steps below are for a Windows guest OS - I'll give Linux guest OS steps in another post.

1. Within the virtual machine's OS (in this case Win XP Pro SP3) I went to Start-Computer-Open-C_drive and right clicked - and went to Properties-Tools and ran a Defrag on the disk. So step one is to Defrag the guest OS.

2. Go to the Microsoft site and download the Windows SysInternals tool called SDELETE into the VM's guest OS. Unzip the file and then go to Start-Run and CMD. Once in a command line window change directory to wherever the SDELETE executable file is located. Run the following command: SDELETE -C This will fill all empty areas of the guest OS virtual disk with zeros.

3. Ok, now for step three. Once SDELETE has finished, then log out and close the VM guest OS. In the host OS, you need to know the path to the VDI file that you are wanting to compact (ex: c:\vms\XPtest\XPtest.VDI). Once noted, then go Start-Run-CMD to open a command line windows and navigate to the directory containing the Virtualbox program (ex: c:\program files\Oracle\Virtualbox). Now, execute the following command:

VBoxManage modifyvdi VDINAME compact

The example in my case would be VBoxManage modifyvdi XPtest.VDI compact Now sit back and let the process run to completion.

By performing these steps I was able to shrink my VDI file size in the host OS to 8.2GB, leaving me nearly 4GB of expansion room in the guest OS.

Yeah, so I know the next logical question - can you expand a VDI file? Nope, although it's a heavily requested feature. My solution - create a new, larger VDI file; attach to the VM that you want to enlarge VDI; boot the VM to an ISO of the UBCD4Win file and use SelfImage to do a byte-level copy of the small VDI to the larger VDI. Shut down the VM, edit the settings to remove the small VDI from the VM and leave the larger VDI - power on the VM. If you have an older OS that does not allow you to enlarge a "C" partition, you can boot one more time to the UBCD4Win ISO file and use the partition management utilities to enlarge the volume before re-booting into the guest OS. Let me know if I need to do a more detailed post on this process and I'll add it to my list.


.

Friday, February 26, 2010

Daemon Tools Lite for Windows 7

Virtual CD Driver for mounting ISOs in Windows 7

Microsoft was gracious enough to give us a Virtual CD tool for Windows XP Pro but not so in Windows 7. So how do we access that library of ISO files we've accumulated? Daemon Tools to the rescue. With Daemon Tools Lite v4.35.5 we once again have the ability to mount ISO images and address them as virtual CD ROM Drives. With over 5 million downloads and counting, it seems that Daemon Tools has become the "go to" solution for those in need of a tool to mount ISO files in Windows 7. A 9Mb download gets you started. Once installed the Daemon Tools utility runs as a Windows service with an icon in the services toolbar. Click on the icon and you'll be presented with a very simple window. Click the CD-ROM image and you'll begin building a media library of ISO files. Right click in the lower window and you can add virtual drive letters. Right click on any of the drive letters and you will be prompted to mount one of the ISO images. Simple.

.

Tuesday, October 20, 2009

Windows Install CD Customizer


nLite's WinOS Boot CD customizer

Here's another "note from the field", a post about a tool tested and proven in a customer environment. Ok, so here's the technical backgrounder: Customer orders a Lenovo tower PC and of course it comes pre-loaded with Vista, but with XP downgrade rights. We're wanting to use this as a staging server for document images to be burned to Blu-Ray disks (hey, they hold 25GB of data) using CyberLink's InstantBurn application. We've also ordered a SATA Raid controller and (2) 250GB SATA disks so we can RAID-1 mirror the drives where the images will be stored. The bonus problem is that the system didn't ship with an XP boot CD, but a system recovery CD set with Vista (ie we're going to have to download and install a bunch of video/motherboard/ethernet/etc. drivers after the OS install). So, we put in the XP SP2 boot CD we have and as the system boots we hit F6 to install the 3rd party drivers for the SATA Raid controller and viola, the dreaded "Insert disk into Drive A:" message appears. Hmm, ok, so what system ships with a floppy drive anymore? We consider a USB Floppy drive for a minute and then realize that this early in the boot sequence there are no USB drivers loaded yet; what to do?

Enter the solution for this type of dilemma from nLite. It's actually a very ingenious but simple solution, which makes it even more appealing. We downloaded and installed the nLite software on a laptop and then (after a few minutes of reading) launched the app. Note: it does require the .NET Framwork 2.0 in order to run. It prompted us for our XP CD (it works with Windows 2003 as well) and then a target directory, where it proceeded to copy the entire XP CD; that said, you'll need around 1.2GB of available disk space to use this tool. Next we were presented with a menu of choices for modifying the now copied XP OS and we chose "Install Drivers", clicked "next" and were prompted for the location of the SATA Raid drivers we wanted to install. True confession here it took us a couple of tries to get the right driver set for the controller, but hey it was a learning process. The nLite utility then proceeded to copy the drivers and then the tool presented us with an option to Finish. We relaunched the application and then selected the "Create Bootable ISO" option. The nLite utility then used the now modified on-disk copy of XP to create a bootable CD ISO file. At this point you launch your favorite CD burning tool and burn the ISO to CD.

Next comes the true test of the tool - the boot of our newly created XP CD. While we failed on our first try (wrong drivers), the second try resulted in a boot sequence that saw the SATA Raid controller drivers load and then we were able to proceed with the installation of XP. Mission Accomplished.

The nLite utility has the following features which you may find helpful:

* Service Pack Integration - update that old SP1 boot CD to SP2/SP3.
* Component Removal - remove unwanted components prior to install.
* Unattended Setup - scripting of installation(s)
* Driver Integration
* Hotfixes Integration
* Tweaks
* Services Configuration
* Patches
* Bootable ISO creation

Tuesday, October 6, 2009

Calendar sync


Tungle Calendar Sync

In a perfect world everyone would use the same e-calendaring system, but of course that is not (and never will be) the case. What would be the benefit of everyone having access to each other's calendar? So that when you want to schedule a meeting with one or more people you wouldn't have to endure dozens of emails trying to get everyone to agree on a date and time to meet. Enter Tungle, a web service that crosses over the proprietary calendaring boundaries so that you can easily schedule meeting with people using their own calendar system. Currently Tungle supports Outlook (with or without an Exchange server), Google Calendar, iCAL and Entourage on MAC, and soon Lotus Notes.

The question becomes - how simple is it? Very simple. Not only that, you can get a vanity URL by signing up at their Tungle.me site. When you sync your calendar with Tungle, it publishes your busy and available times, not the details of your calendar entries. This allows others to see your available times. They even have an iPhone app that gives you full functionality for using the scheduling application. Sweet.

The added bonus is that even if you don't use one of the supported calendaring systems, you can still use your Tungle calendar to coordinate and schedule meetings with others. Oh, and yeah, it auto-updates across time zones (duh, of course they thought of that).

So, if you have need of sharing calendars and making meeting appointments with people outside (or even inside) your company who don't share a common calendaring system, you might want to give Tungle a try.

Wednesday, May 6, 2009

CyberLink's InstantBurn for Optical Media


Use CD-RW and DVD-RW like a removable disk


Cyberlink's InstantBurn-5 software turns your CD-RW, DVD-RW and rewritable BlueRay discs into a removable media drive. You can drag and drop files from folders, send unwanted files to the Recycle Bin for deletion, rename files, and change file property information. The verification function checks whether data has been written properly, ensuring the reliability of the data. InstantBurn supports UDF (Universal Disk Format) versions 1.02, 1.5, 2.0, 2.01 and 2.5. The only unfortunate fact is that it's a MS Windows-only product, supporting Vista, XP, etc., but no Linux or OS-X support at this time.

One suggested use of this product would be to put a DVD-RW or BlueRay-RW drive in a PC with InstantBurn-5 software and then share the re-writable disk across the network as NAS storage, using it for instant archiving of data to an optical disk. The beauty of the solution is that you don't have to master the disk and do write-at-once burns of your data - you can keep writing to it as needed until full and then replace and continue archiving data onto a new re-writable optical platter.

All-in-all another great product from CyberLink. Check out the rest of their media editing and mastering software as well as PowerBackup for PC data archiving.

Friday, March 6, 2009

NAS adapter is too cool


Addonics NAS Adapter for USB


In my quest to provide some networked storage on my home network I stumbled upon the Addonics USB to NAS adapter. Priced at only $55.00, this adapter provides two much needed features in a very small form factor and inexpensive to boot. In a nutshell, you can take any USB hard disk, attach the Addonics adapter and turn that disk drive into a NAS storage device accessible via SMB or FTP. The real BONUS feature here is that this adapter can also serve as a network print server if you attach a USB printer.

Product Features

* Convert any USB 2.0 / 1.1 mass storage device into a Network Attached Storage device
* Great for creating a custom Network Attached Storage appliance.
* USB port can be used to power most 2.5" USB hard drives or any low powered USB storage device.
* Support Fast Ethernet 10/100Mbps.
* Simple to install
* Small and light weight. Size slightly longer than a C size battery. Can be installed practically anywhere
* Can be set as DHCP server or client.
* Support Samba server for up to 64 concurrent clients.
* Support FTP server for up to 8 concurrent users.
* Can be set as a print server to attach any USB printer to the network
* Built-in Bit Torrent client for direct download to the attached USB storage device
* Can be set as a UPnP AV server to share photo/music files stored on the file server with XBOX 360 video game consoles connected to the LAN
* User management to allow read only or read/write access to folders
* Administrative management access via web browser with password security.
* Compatible with all Windows OS, Mac OS, Linux 2.6.x and above

Thursday, February 19, 2009

OpenProj for Project Management


I had the opportunity the other day to test out OpenProj, an open source project management tool. I was sent a MS Project (.MPP) file to review a project plan for a website development effort but did not have MS Project installed on my laptop. Unlike some other MS applications like Powerpoint, Microsoft does not have a viewer app available for MS Project files. Enter Serena's OpenProj software, a free open source alternative to MS Project. After downloading the OpenProj software and installing on my Windows XP laptop, I was able to not only easily open the .MPP file but was also able to modify the project milestones and view all of the project details. While I didn't have a chance to test them, other open source options for project management are DotProject and Open Workbench. For collaborative project management in a hosted environment, I'd also recommend taking a close look at BaseCamp's software-as-a-service solution which starts at only $24/mo. for 15 projects, 3GB of storage and unlimited users. Also worth a close look is Zoho Project, part of the comprehensive suite of SaaS apps from Zoho.com.

Tuesday, December 9, 2008

eJabberd for Instant Messaging


eJabberd Open Source Instant Messaging Server

Another "victim" in the ongoing saga of free open source software (FOSS) being hijacked by a commercial entity only to be later sent to the deadpool is Jabber, recently acquired by Cisco. A project begun in 1998 by Jeremy Miller (per wikipedia) and first released in 2000 as jabberd, Jabber quickly became the basis for the XMPP protocol standard. Probably the most well known adopter of XMPP is Google with the Google Chat software. Many other commercial software companies have also adopted the proven and well regarded XMPP standard for their own integrated messaging, VoIP and presence awareness applications.

Recently I had a customer discussion that centered around an issue with the lack of phone lines (in-coming and out-going) between their distribution centers. There were complaints coming in from the warehouses of busy signals during the peak times of the day. The initial discussion centered around the possibility of voice over IP (VoIP) being a way to solve the problem via provisioning more voice lines between locations. Ok, so not being one who carries around a hammer looking for nails, I asked a more obvious question - what the heck is everyone trying to call each other for at 4pm? The answer was "instant gratification", the warehouse people and order processing people needed quick answers so orders could be completed and picking tickets issued, so trucks could begin being loaded. Email was "too slow" to wait on those simple questions - so my obvious response was - so what about instant messaging. You'd have thought I asked someone to streak naked through the parking lot... no way, then people would be wasting time IM'ing their friends all day instead of WORKING, was the response. Ok, so I had to clarify, I wasn't talking about using AOL or Yahoo, etc., I was talking about implementing an in-house IM server. Response: "We looked at MS Messenger and IBM Sametime, and that's more than we want to spend on IM." Yes, the same people who wanted to throw a VoIP solution at a POTS line congestion problem that would have cost in the high tens of thousands of dollars were balking at spending $40k on IM. As usual, I had a suggestion: "So what about open source, maybe something like Jabber?" Again, a blank stare. I had to pinch myself to make sure I hadn't time warped back to 1998, but no I was again having the "open source is OK" conversation.

After a lengthy discussion I made the suggestion to download eJabberd and use Pidgin as the client for testing purposes. My reasoning for going with eJabberd is that for a customer like this, it would be best to have an option for a commercial support option for the software. With eJabberd that option is available from Process One among others. I'm not doing an ad here for them so just take that as a mention of an alternative. Anyway, just keep in mind that there are options out there to solve problems that don't have to cost a great deal of money.

Typically, if you can win the technology adoption battle via use of FOSS, then if you need advanced features later as user adoption matures, the money to move to a commercial package seems to magically appear where none was available before. The ISVs figured this out a LONG time ago by offering shareware or feature/function-limited freeware versions of their software. It used to be called the "puppy dog close" in sales school - get the client to own it, name it, care for it, feed it and love it, and you're guaranteed they'll have to buy food for it, get it shots, etc. It just never ceases to amaze me that internal IT departments still haven't figured out that they need to get the technology in the door and working and then proving usefulness to management only takes turning off the unauthorized project server and waiting for users to start hollering.

If you're in need of a good IM server, eJabberd is a great option. You can click on over to XMPP.org and see a list of other server options as well as a list of client options.

Monday, November 17, 2008

xkoto for MS SQL clustering


xkoto Gridscale: A better way to cluster MS SQL?


If you've ever tried to implement a MS SQL server cluster then you're familiar with the quorum drive concept and how it is used for clustering. Microsoft's NTFS is a single instance filesystem that does not have a clustering component. While there are replacements for NTFS like HP's Polyserve cluster filesystem product, I recently uncovered xkoto Gridscale. xkoto's Gridscale for MS SQL is a very different approach to clustering. I was fortunate enough to have a brief technical discussion with one of their engineers the other day and here's the short version of his explanation of Gridscale. The Gridscale product claims to avoid the scalability limitations, technical complexity, and costs associated with traditional clustering, mirroring and replication solutions for SQL Server by assisting you to scale application load horizontally across multiple, active-active instances of SQL Server. Also, you can eliminate planned and unplanned database outages since all SQL Servers managed by Gridscale are fully active. Finally, since Gridscale supports databases in remote locations, you can meet disaster recovery requirements without the complexity of traditional transaction-based (journaling) or storage replication solutions.

Ok, so this begs the obvious question: How does this work? Well, Gridscale runs on a pair of gateway (my term, not theirs) servers (active/passive). These gateway servers run between your applications and databases (see the image above this post) to manage multiple, active-active copies of SQL Server databases running anywhere on the network. Gridscale then load balances read requests, while write requests and database changes are propagated asynchronously to all databases to keep them in sync. The SQL Server instances themselves operate completely independently from one another, unaware that they are part of a pool of database servers. xkoto claims that with Gridscale, applications typically require little to no modification beyond the use of a special database driver (standard ODBC or JDBC are two options) which talks to the database virtualization server (the gateway servers).

The Gridscale architecture also allows for on-the-fly addition of SQL server nodes to the cluster, as well as the ability to script a node to remove itself from the cluster while backups are performed and then the node can be re-added to the cluster and updated. If my notes are correct this has been tested out to twenty (20) nodes in a single cluster configuration. One slight limitation is that each gateway pair can only address a single instance of the SQL database engine per server (or in this day and time of virtualization, per operating system instance). So if you have multiple SQL instances per server (not multiple databases now, multiple instances of the SQL database application engine in memory), then you'll need to deploy multiple Gridscale gateway pairs.

The xkoto Gridscale for MS SQL was just introduced back in September as a follow on to their very successful and mature Gridscale for DB2 product.